Torres Del Paine O Trek
I recently did the O trek in Torres Del Paine National Park in Chile. It is a ~73 mile loop which we did over 7 nights (averaging ~10 miles of hiking per day). The purpose of this post is to:
- Provide helpful tips and suggestions for others planning to do the trip (i.e. things I wish I knew)
- Document my journey and experience
- Compile a list of helpful logistical resources
Table Of Contents
- Tl;dr
- What is the O Trek?
- The Weather
- Gear
- The Campsites
- Itinerary
- Seron
- Dickson
- Perros
- John Gardner Pass
- Grey
- Paine Grande
- Cuernos
- Chileno
- Misc Photos
Tl;dr
If you don’t read the rest of the article, here are the top tips that I wish I’d known before going:
- Don’t carry a waterproof backpack cover. It will either blow away, or catch the wind like a parachute and knock you over. Instead, line your backpack with a dry bag or trash bag. Then, put all your stuff in individual dry pouches or zip log bags inside the bigger dry bag to make sure everything stays dry. This way if your backpack gets wet, your stuff stays dry.
- Spend at least one full day in Puerto Natales. This is where you can get any last minute supplies, fuel canisters, lighters, matches, etc.
- While in Puerto Natales, Day Zero is not only a great place to pick up equipment, but the owner gives an excellent talk at 3pm on the O trek. This talk is a must go. He will provide tons of insights, tips, etc for your trek.
- Carry hiking poles. They will help with the varied terrain and stabilize you when a gust comes by.
- Fires are only permitted in specific areas in campsites; not anywyere else in the park. Plan your days around this. I.e. if you’re going through a campsite, plan for a hot lunch that day. If not, plan for a cold lunch. While bars and trail mix work fine, they get boring fast. A great lunch option is tortillas wrapped with cheese and salami (or peanut butter etc). If you do this, pre-wrap the tortillas.
- Los Cuernos is the best campsite. You must stay here.
- Do not stay in Paso. It might seem tempting as you cut the hardest day in half. However, the campsite is miserable since it is at altitude. It was cold and rainy when we passed by.
- Eat a hot lunch at Paso. You will be cold and tired from the pass.
- BusBud is a great resource for booking your busses.
- Do not carry a camelbak. Water is available almost every 30 - 45 minutes for refill, so there is no reason to carry any more than 1L at a time. Taking out your camelbak to refill every so often will get annoying. Instead, just take a 1L Nalgene or simillar. While most people do not filter water, we took a Sawyer Squeeze and used it for all water in streams. We did not filter water from taps at campsites.
- Almost all the campsites take credit card. However, where you absolutely need cash is: 3,000 CLP for the shuttle from Laguna Amarga to the trailhead and the park entrance fee (which was 21,000 CLP when we went, but might be higher now).
- If you have the means, carry less food. Food at campsites can be expensive, but not crazy. For example, a burger is ~15 USD. 10 tortillas with cheese and salami will come out to ~15 USD as well. If we were to do it again, we’d rent our tents and probably carry 50% of the food (and rely on campsites for the other 50%).
- It is worth it to rent a tent every night. Not only do you save the weight, but you also don’t have to deal with pitching and taking down a tent potentially in the rain. You are guarnateed a dry, stress-free shelter every night.
- The food on the trail is very veggie friendly. For full meal service though, be sure to let them know beforehand that you are vegetarian.
- This might be an unpopular opinion, but the morning hike to the torres on the last day isn’t worth it. You’ve done the O-Trek which was spectacular. Why hike at night, in the cold and high winds, simply to get a photo that has been taken millions of times. Seriously, just skip it. Hiking is about the journey, not the destination, so hiking at night to reach a crowded lookout and get one photo seems pointless.
What is the O Trek?
The O circuit is a ~73 mile loop (thus the name O) which goes through Torres Del Paine national park. It takes around 7 - 9 nights depending on your mileage.
Below is a map where the O circuit is highlighted in purple. The green trail is called the W and is a subset of the O circuit. In this post, we will focus on the O circuit.

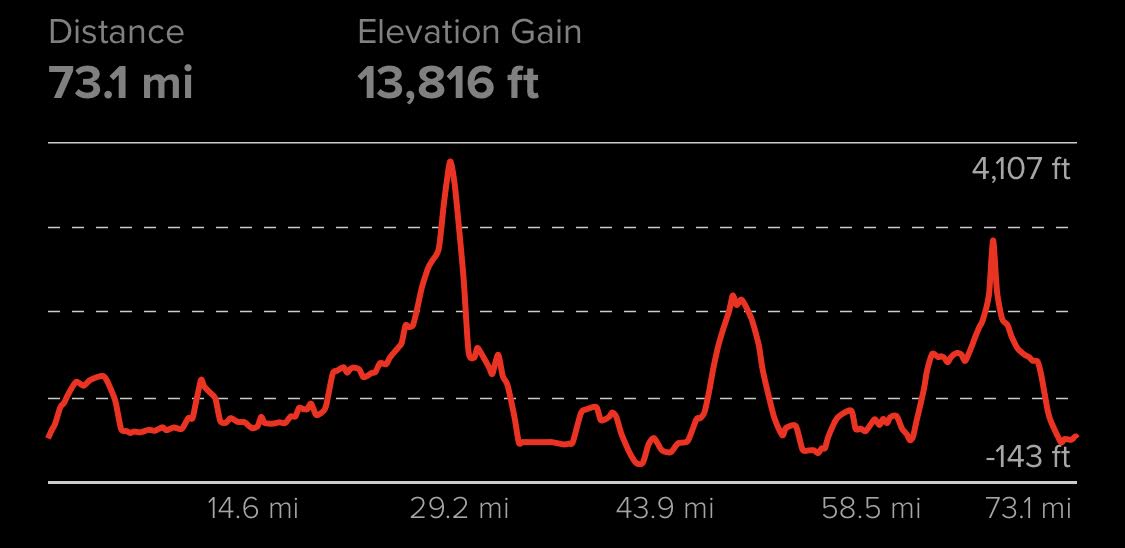
Here is the elevation profile and mileage of the loop (AllTrails source):
The Weather
You should be very well prepared for rain and wind as these are inevitable. On the pass, we did encounter some snow, but apart from that there wasn’t too much snow.
Gusts can be as strong as 40 - 50 mph. Note the difference between gust and wind is that a gust is a sudden increase in wind speed that lasts ~30 seconds. If you feel a gust, get low, try to find cover behind a bush, and brace yourself. Gusts can be strong enough to knock you over.
The weather changes fast. So if it is raining, it will probably stop within 30 minutes. The wind and sun do wonders to quickly dry your clothing and equipment, so don’t be afraid of getting stuff wet.
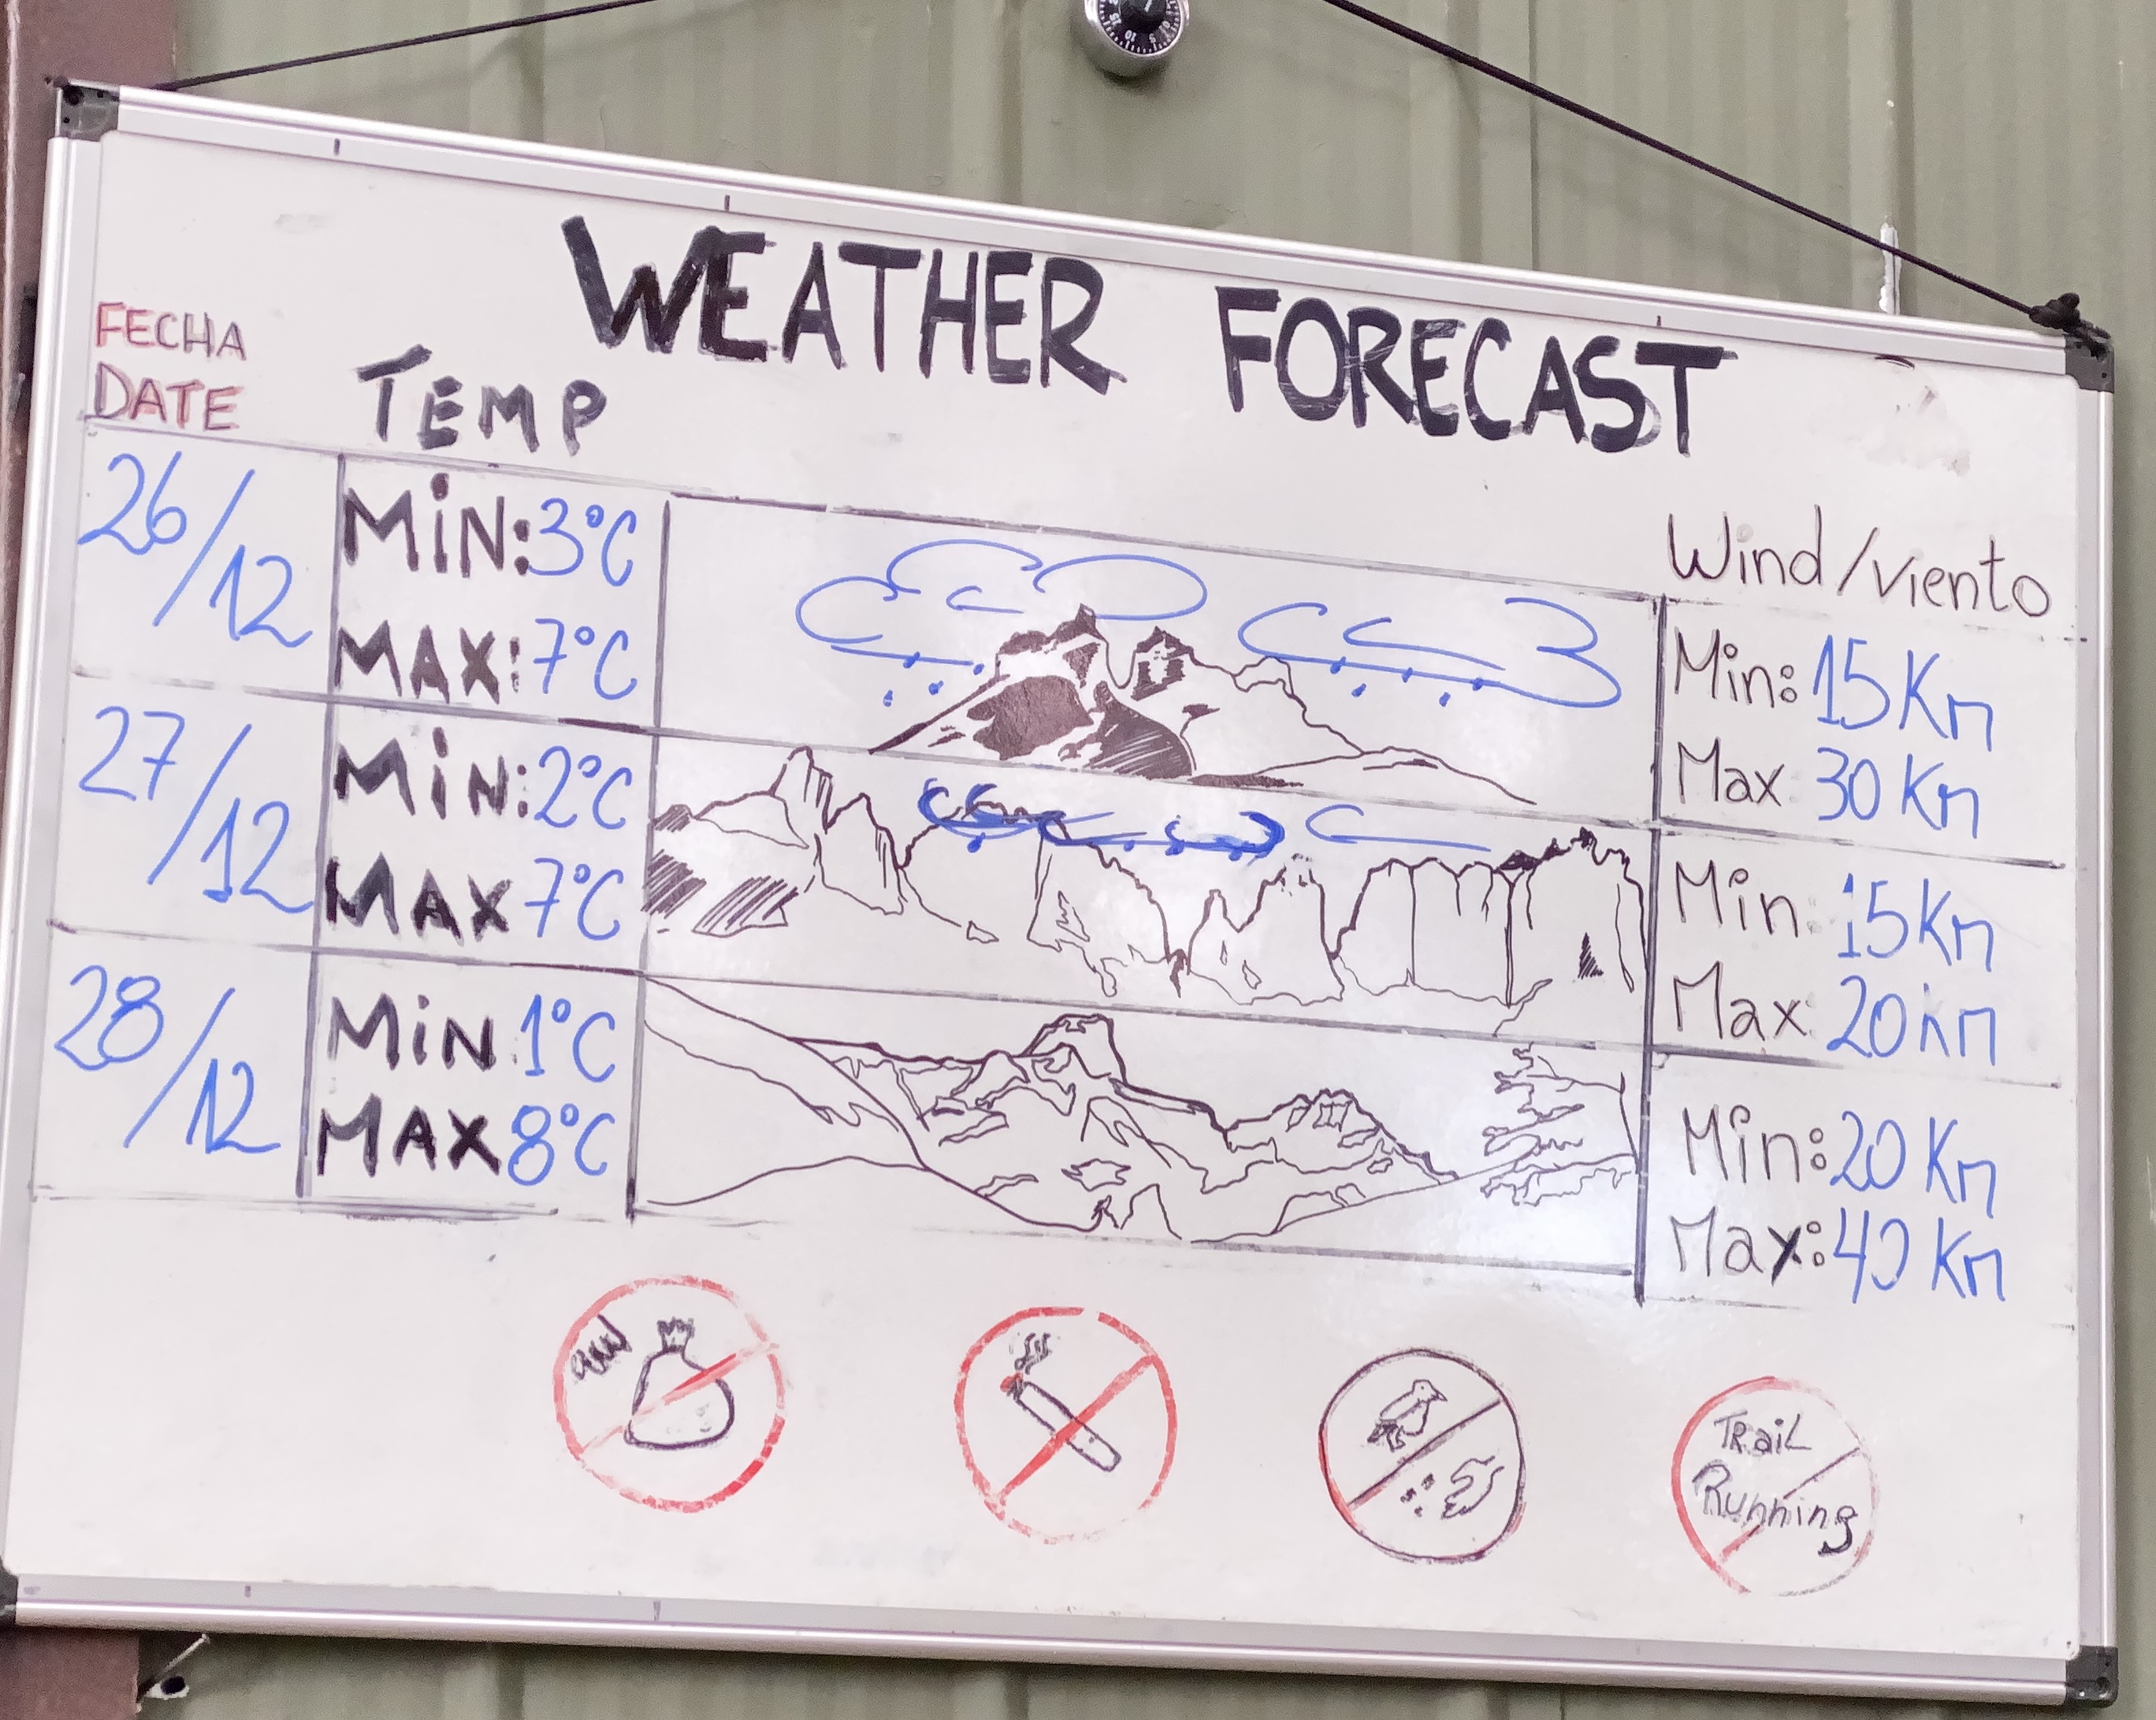
This was “warm” weather.
Gear
Tent: We took a Big Agnes Copper Spur UL 3 tent for two people. We took 12 stakes (4 for the tent and 8 for the fly). The tent held up great in the rain and wind. The key to withstanding the wind is to stake the tent completely taut. This way the force of the wind is absorbed by the stakes and not the poles.
Sleeping Bag: I used a 15 degree sleeping bag and this was plenty warm. At night, I wore thermals, woolen socks, and a beanie on especially cold nights.
Sleeping Pad: I used a regular inflatable therm-a-rest.
Boots: Make sure you get waterproof boots. Hiking in rain, mud, and swamps is inevitable and you want to keep your feet as dry as possible.
Rain Jacket: A reliable rain jacket that also acts as a wind breaker is important for keeping you dry during the day. This is the one I used and it worked well.
Rain Pants: These are optional, but can be helpful in rainy and windy situations. Alternately, a pair of quick dry hiking pants are sufficient. Alternatively, gaiters are nice since they keep your pants clean.
The Campsites
As seen in the map, there are ~12 campsites that must be reserved before you start the trek. These can be reserved from one of 3 different companies:
Note that when I booked, the sites weren’t working (I used Chrome; maybe they are designed for another browser). However, both Fantastico Sur and Vertice were very responsive over email. This has the challenge of coordinating dates across both companies, but if you book early enough this shouldn’t be a problem. My recommendation is to have the campsites you want to stay at (see itinerary for the sites we stayed at) and some flexible dates. Then, email the respective companies with the sites and dates and see what they come back with.
The campsites generally fall into 2 categories:
- Free (CONAF sites)
- Not free (Vertice and Fantastico Sur)
The not free campsites have pretty good amenities. They vary in quality from site to site, but generally you get:
- Running water
- Flush toilets
- Showers
- The ability to rent a tent
- The option to rent/stay in a dorm room
- A market with basic food supplies
- An indoor area to cook and eat (but you must bring your own stove)
- A bar where you can purchase food/drink
- A restaurant where you can buy a full dinner service
The free campsites have almost no amenities and tend to be in more harsher areas. They will have porta-potty style toilets and a shelter for cooking (but it won’t be indoors). You will also need to carry and pitch your own tent. My recommendation is to avoid the free campsites.
Itinerary
Here are the campsites we stayed at (and the approximate hike lengths that day):
| Night | Site | Mileage |
|---|---|---|
| 1 | Seron | 8 miles |
| 2 | Dickson | 11 miles |
| 3 | Los Perros | 7 miles |
| 4 | Grey | 9 miles* |
| 5 | Paine Grande | 6 miles |
| 6 | Los Cuernos | 13 miles** |
| 7 | Chileno*** | 8 miles |
* Los Perros to Grey is the hardest day with the most elevation gain/loss. See John Gardner Pass for more details.
** This can be as short as ~7 miles if you skip the optional mirador (lookout).
*** Chileno is optional. If you aren’t planning to do the Torres hike in the morning, you can probably skip it and just exit the park from Cuernos.
If you have an extra day, my recommendation is to stay in Italiano on night 6 (instead of Cuernos) and then do Cuernos and Chileno on night 7 and 8 respectively. While Italiano is free, it is a decent enough campsite. It will allow you to go all the way to the mirador without feeling rushed and break up and otherwise long day.
This AllTrails map shows the circuit with the campsites dotted.
We took the 7 am bus from Puerto Natales to Laguna Amarga (the park visitor center). Here, you will do some required paperwork and the staff will check all reservations. Then, we took a shuttle to Hotel Torres which is where we started the trek to Seron.
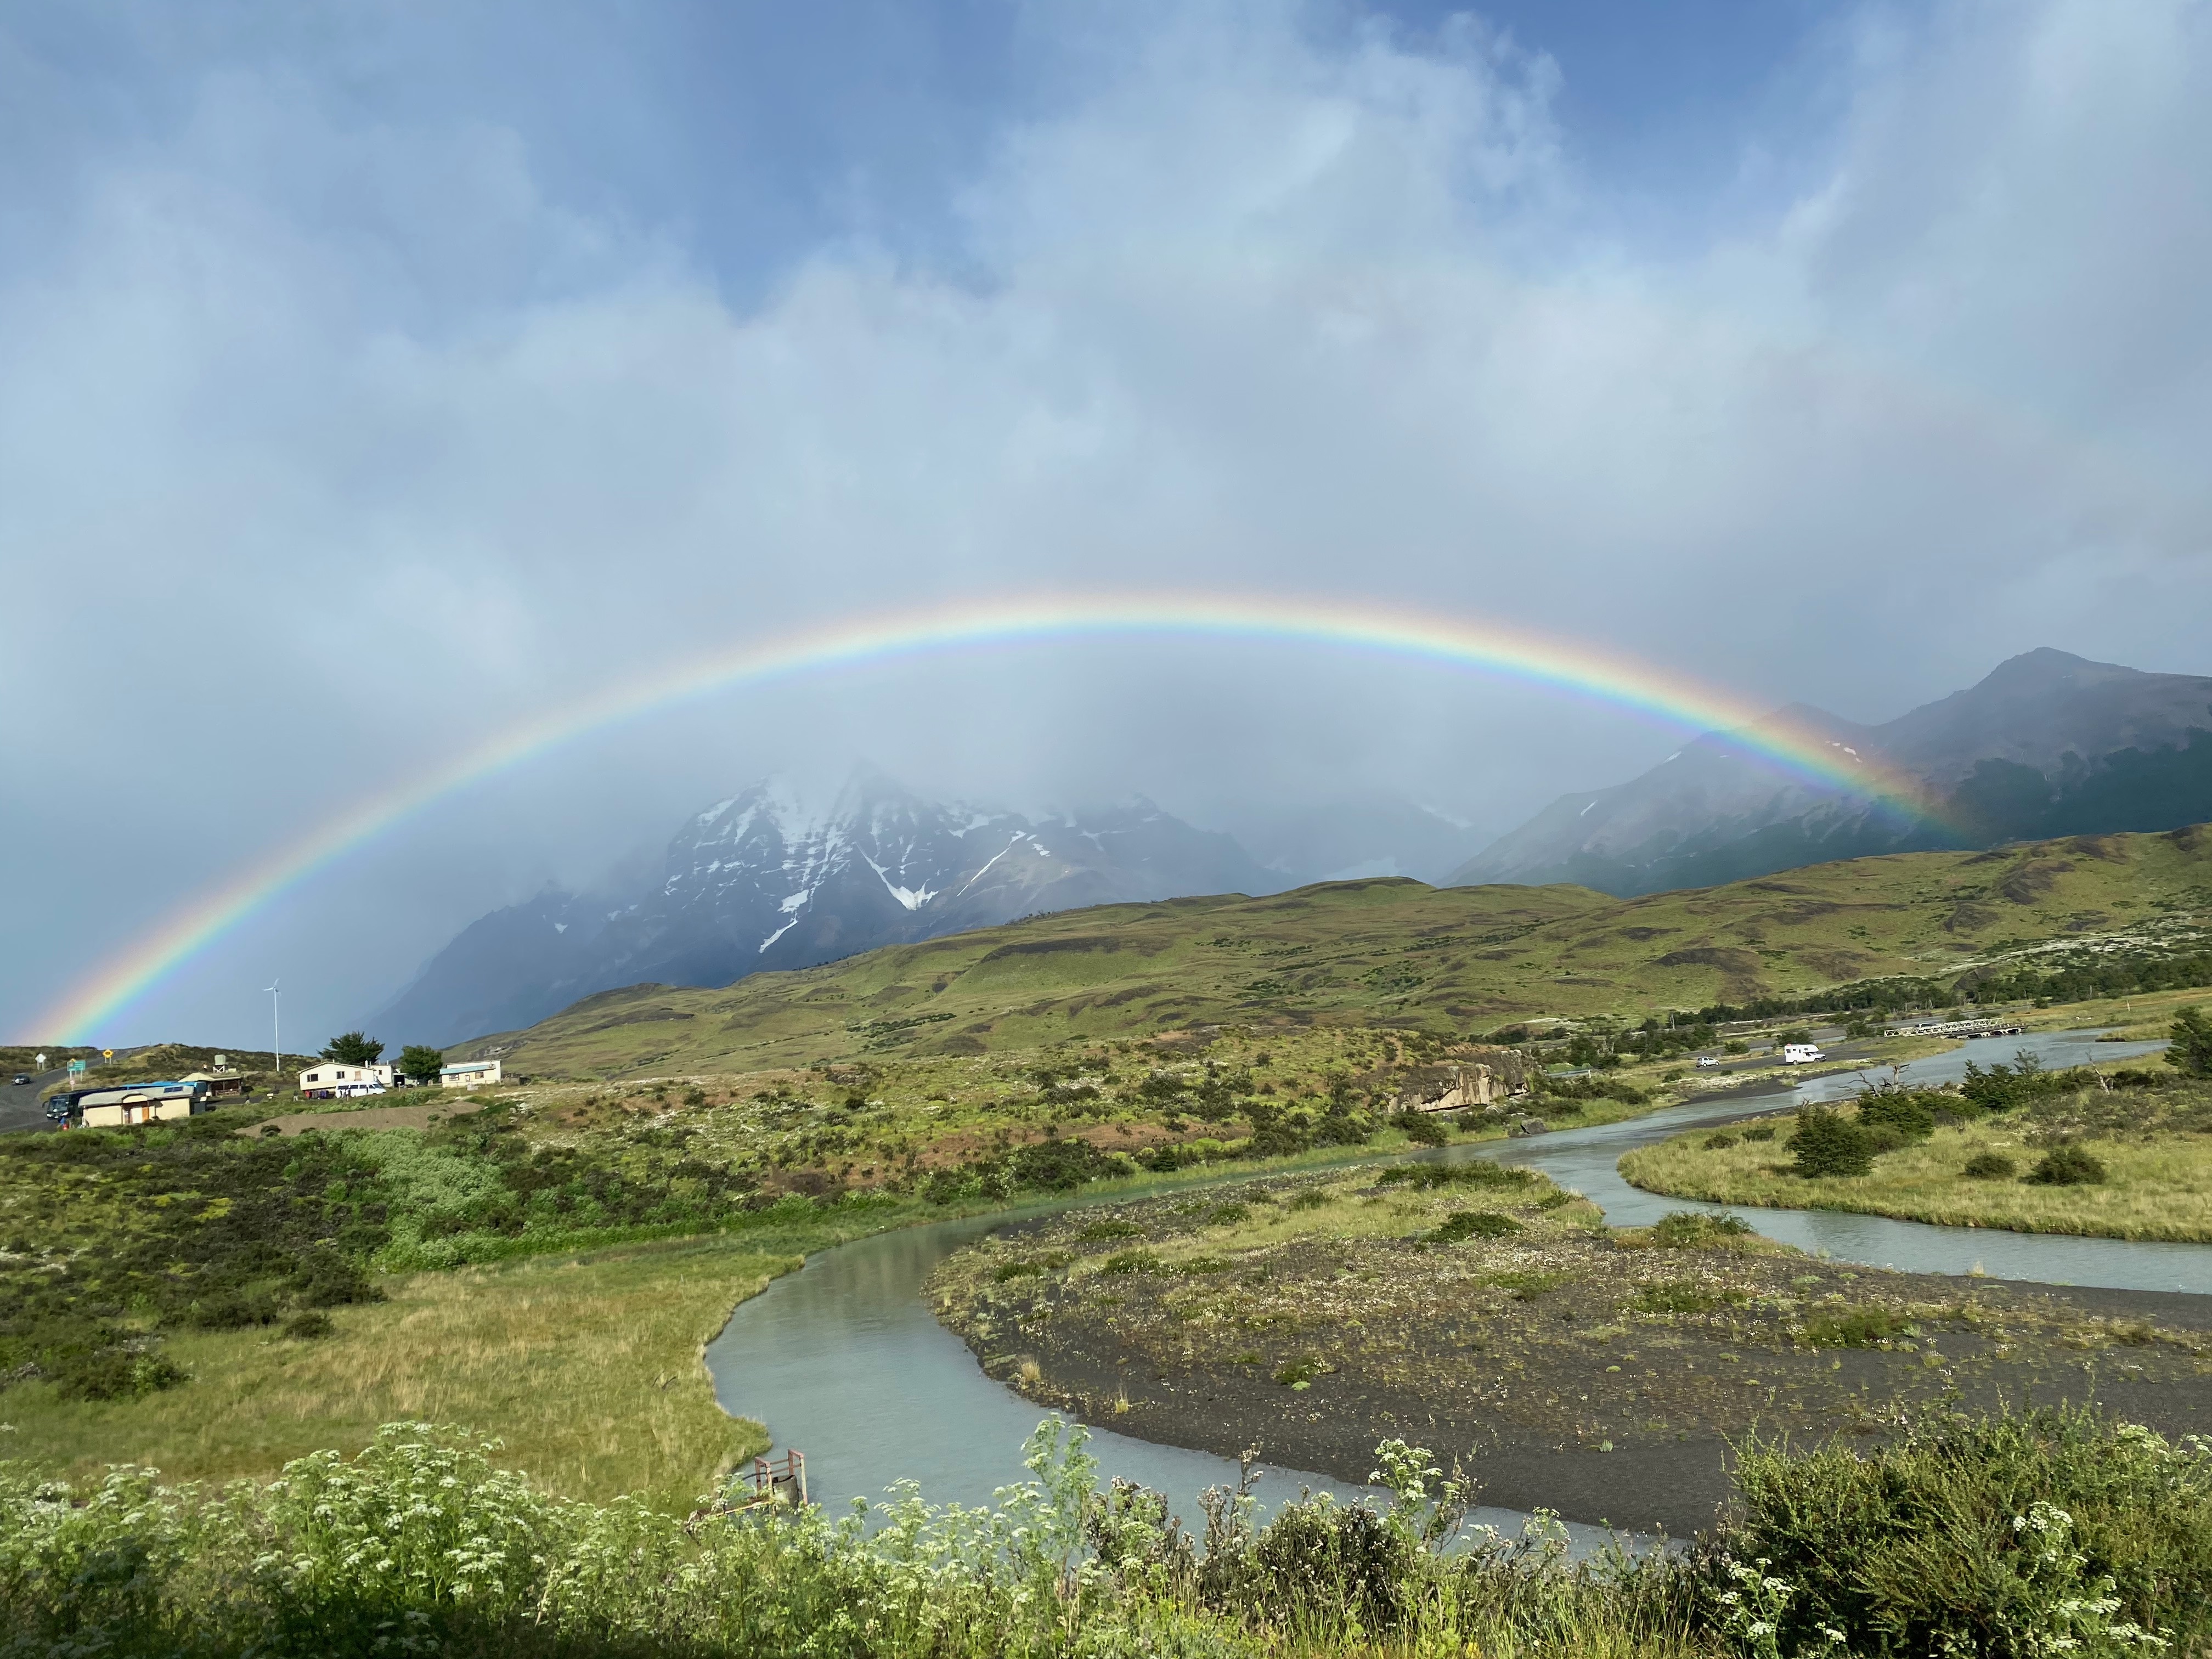
Started off the trek with a full rainbow at Laguna Amarga. This could only be a good omen.
Seron
Facilities: Bathrooms were fairly clean and toilets were reliable. This was the only campsite where the bathroom sinks had a hot water option. I did not use the showers here. There was 1 male toilet, 1 femaile toilet, and 1 shower for each gender.
Dining: I did not use the market or order hot food. In this campsite, there was a tent for cooking and eating. It sheltered you from the wind, but could get quite noisy when a gust came through.
Hike: We began the hike from hotel Torres. It was a fairly easy 3 - 4 hour hike. It starts off through some hills and ends in a meadow filled with wildflowers. The field had some serious gusts, but nothing unmanageable. It was actually quite nice as the wind dried our gear which was wet from an earlier rain we experienced.
Time To Leave: My recommendation is to get an early start and leave ~7am.
Photos:

Wildflowers on the meadow to Seron.

Sunrise in Seron
Dickson
Facilities: The water flow in general around the site was quite slow. This resulted in very sluggish toilets (one was actually clogged). It was also almost impossible to wash hands. In the men’s bathroom, one shower did not have hot water and the other had lukewarm water at best. The women’s showers had hot water.
Dining: The mini mart seemed well stocked. The dining/cooking area was indoors and quite spacious.
Hike: The hike from Seron to Dickson really has two parts. The first half is along a mountainside with a beautiful lake to your left. This part can be quite windy. There is some elevation gain/loss here and there but nothing too bad. You will reach a ranger station where they check all your permits. This begins the second half of the hike which is through meadows/swamp. Because of the uninteresting terrain, this part felt like it dragged on forever. Also because it was the second day, it was quite painful on the legs. I would say take a good break at the ranger station before starting off on the next half.
Time To Leave: My recommendation is to relax and enjoy Dickson. The hike to Perros is relatively short. Sleep in, enjoy a nice long breakfast, and maybe hit the beach. We left here around 10:30 or 11.
Things To Do: There is a nice “beach” with a deep blue lake. You can’t swim in the water, but it is still enjoyable to sit at and maybe read a book.
Photos:

Lake en route to Dickson.

Hike from Seron to Dickson.

The last stretch to Dickson.
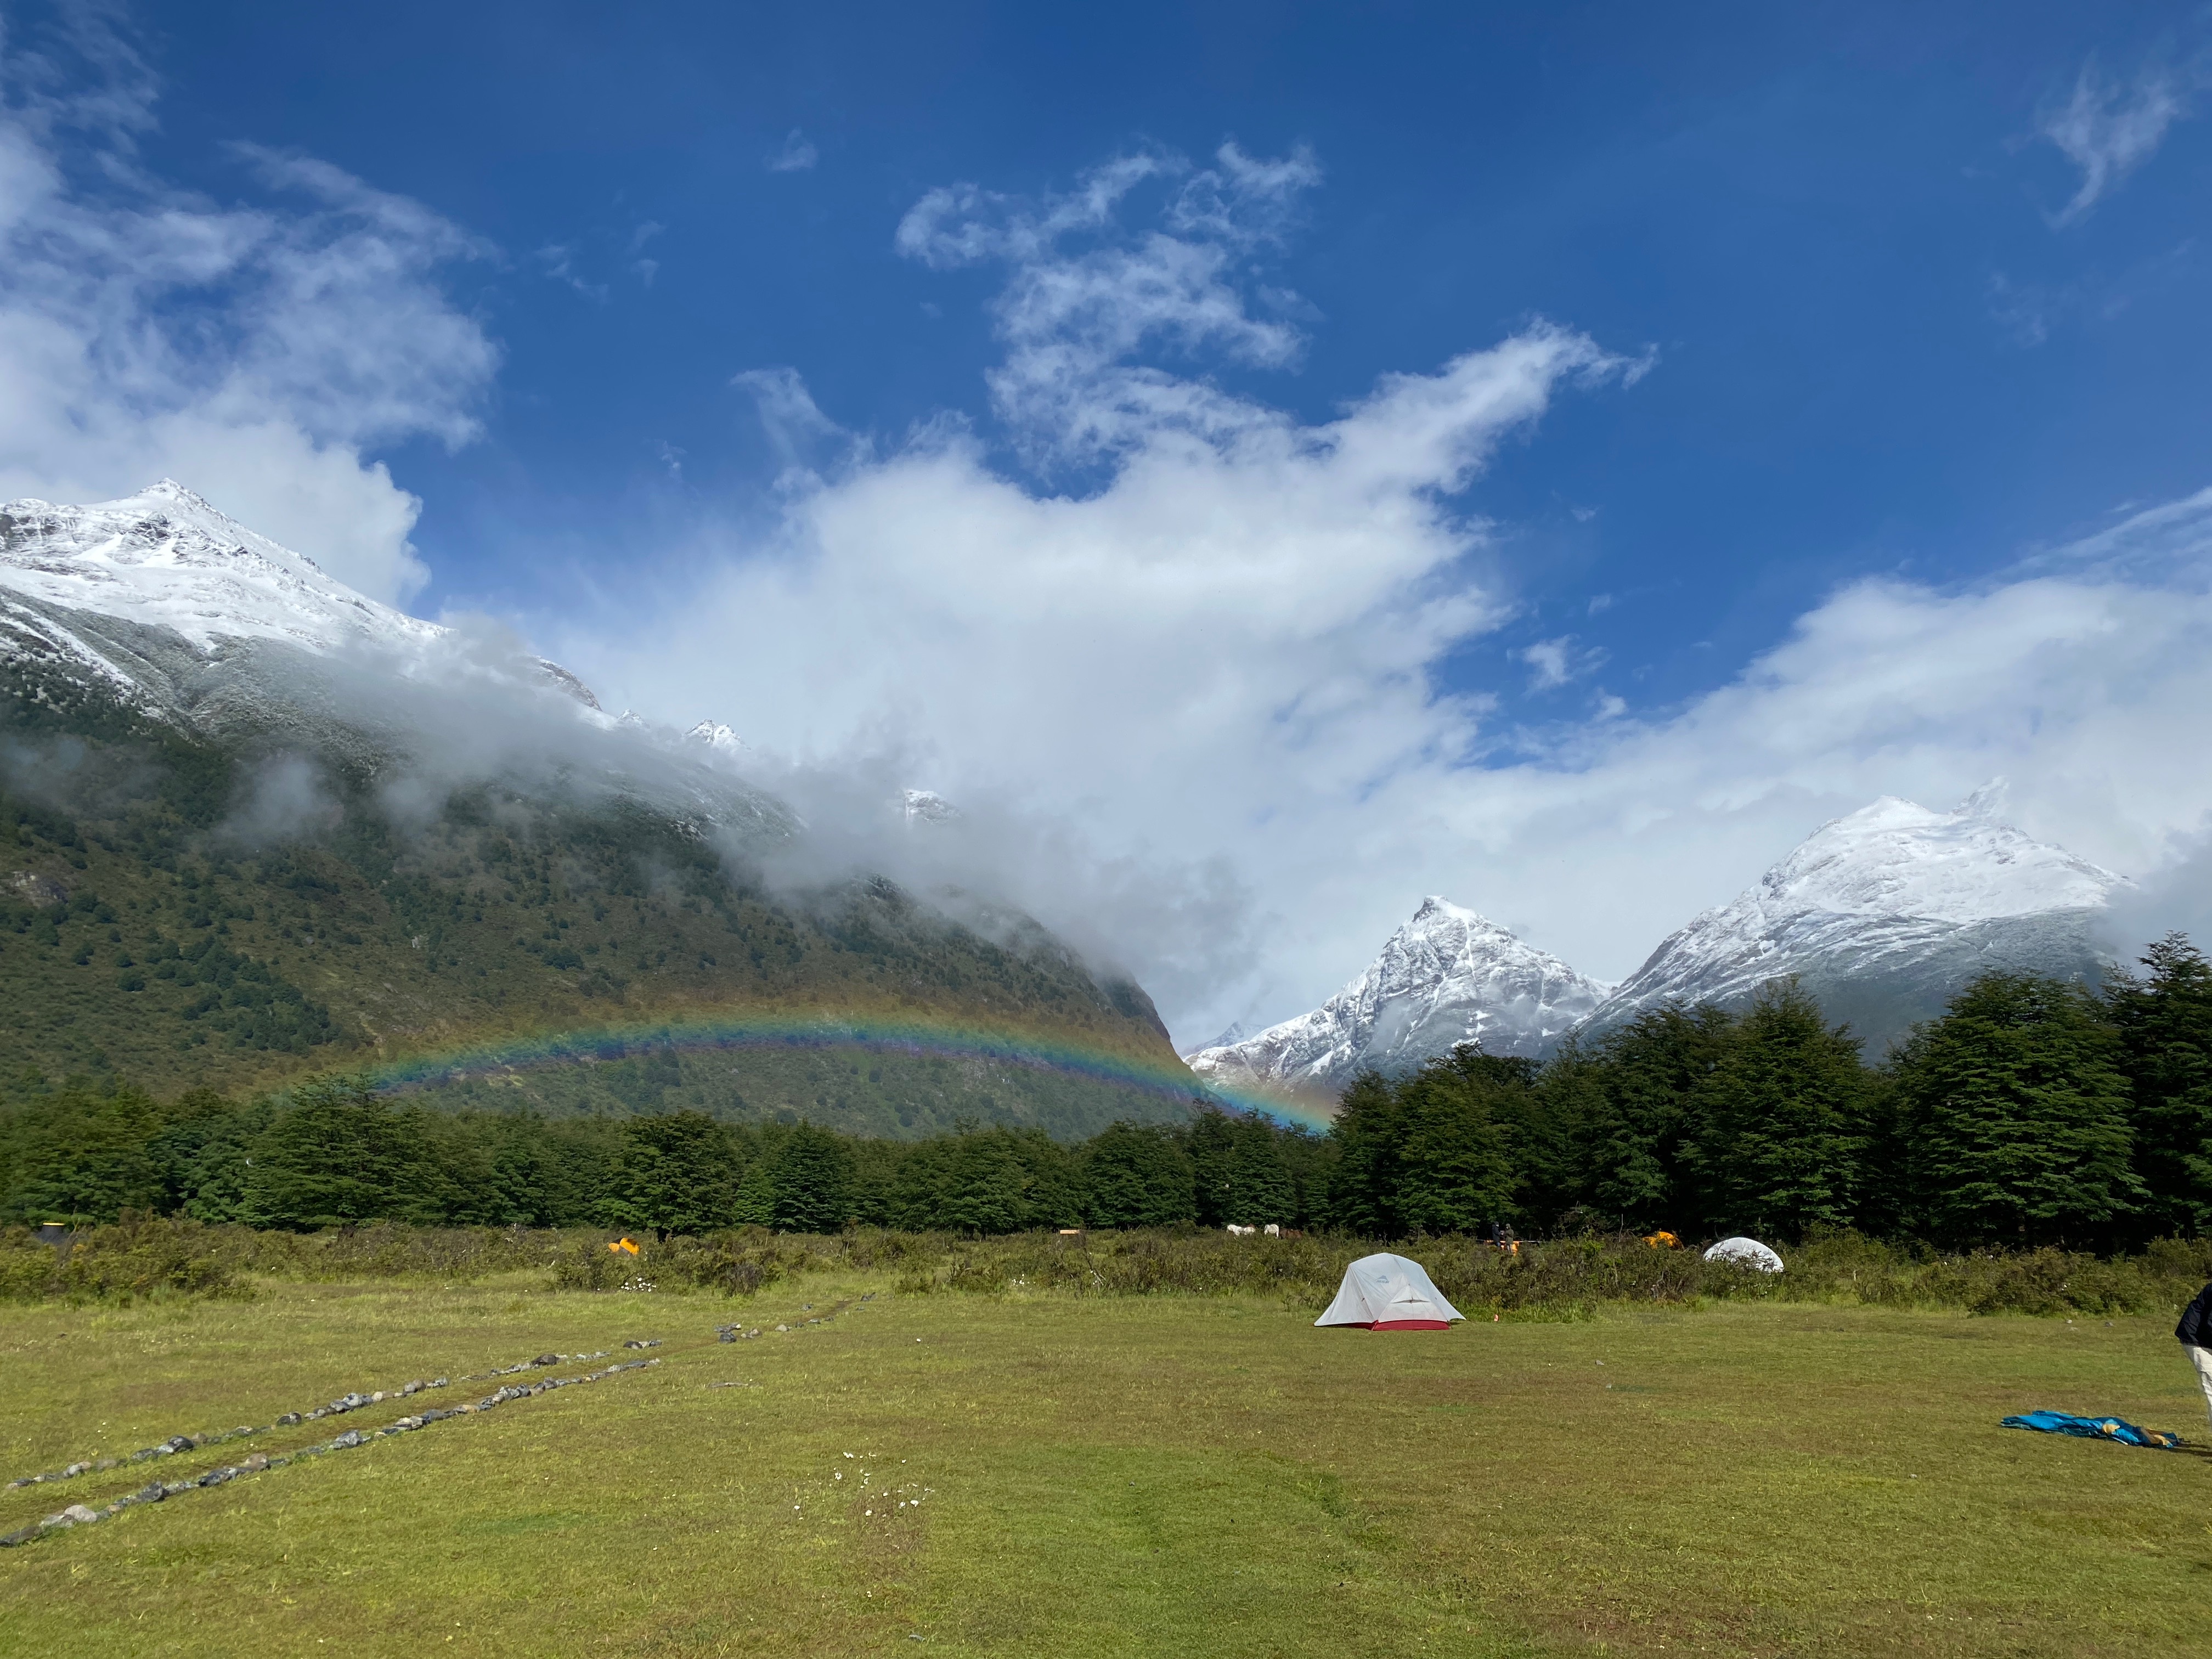
Rainbow in Dickson before heading off to Perros.
Perros
Facilities: The toilets worked well, but the sinks in the men’s bathroom ran too slowly to wash your hands. I did not use the showers, so can’t comment on those.
Dining: There is an indoor area for cooking and eating. It didn’t have closing times, so we could get an early start and have breakfast at around 4 am.
Hike: The hike from Dickson to Perros is quite relaxed. There is some uphill in the beginning but it quickly flattens out for the majority. This is why you can spend some time in Dickson and get a late start.
Time To Leave: Hit the trail by 6am. Perros to Grey will be the hardest hike you have. You are going over the John Gardner Pass.
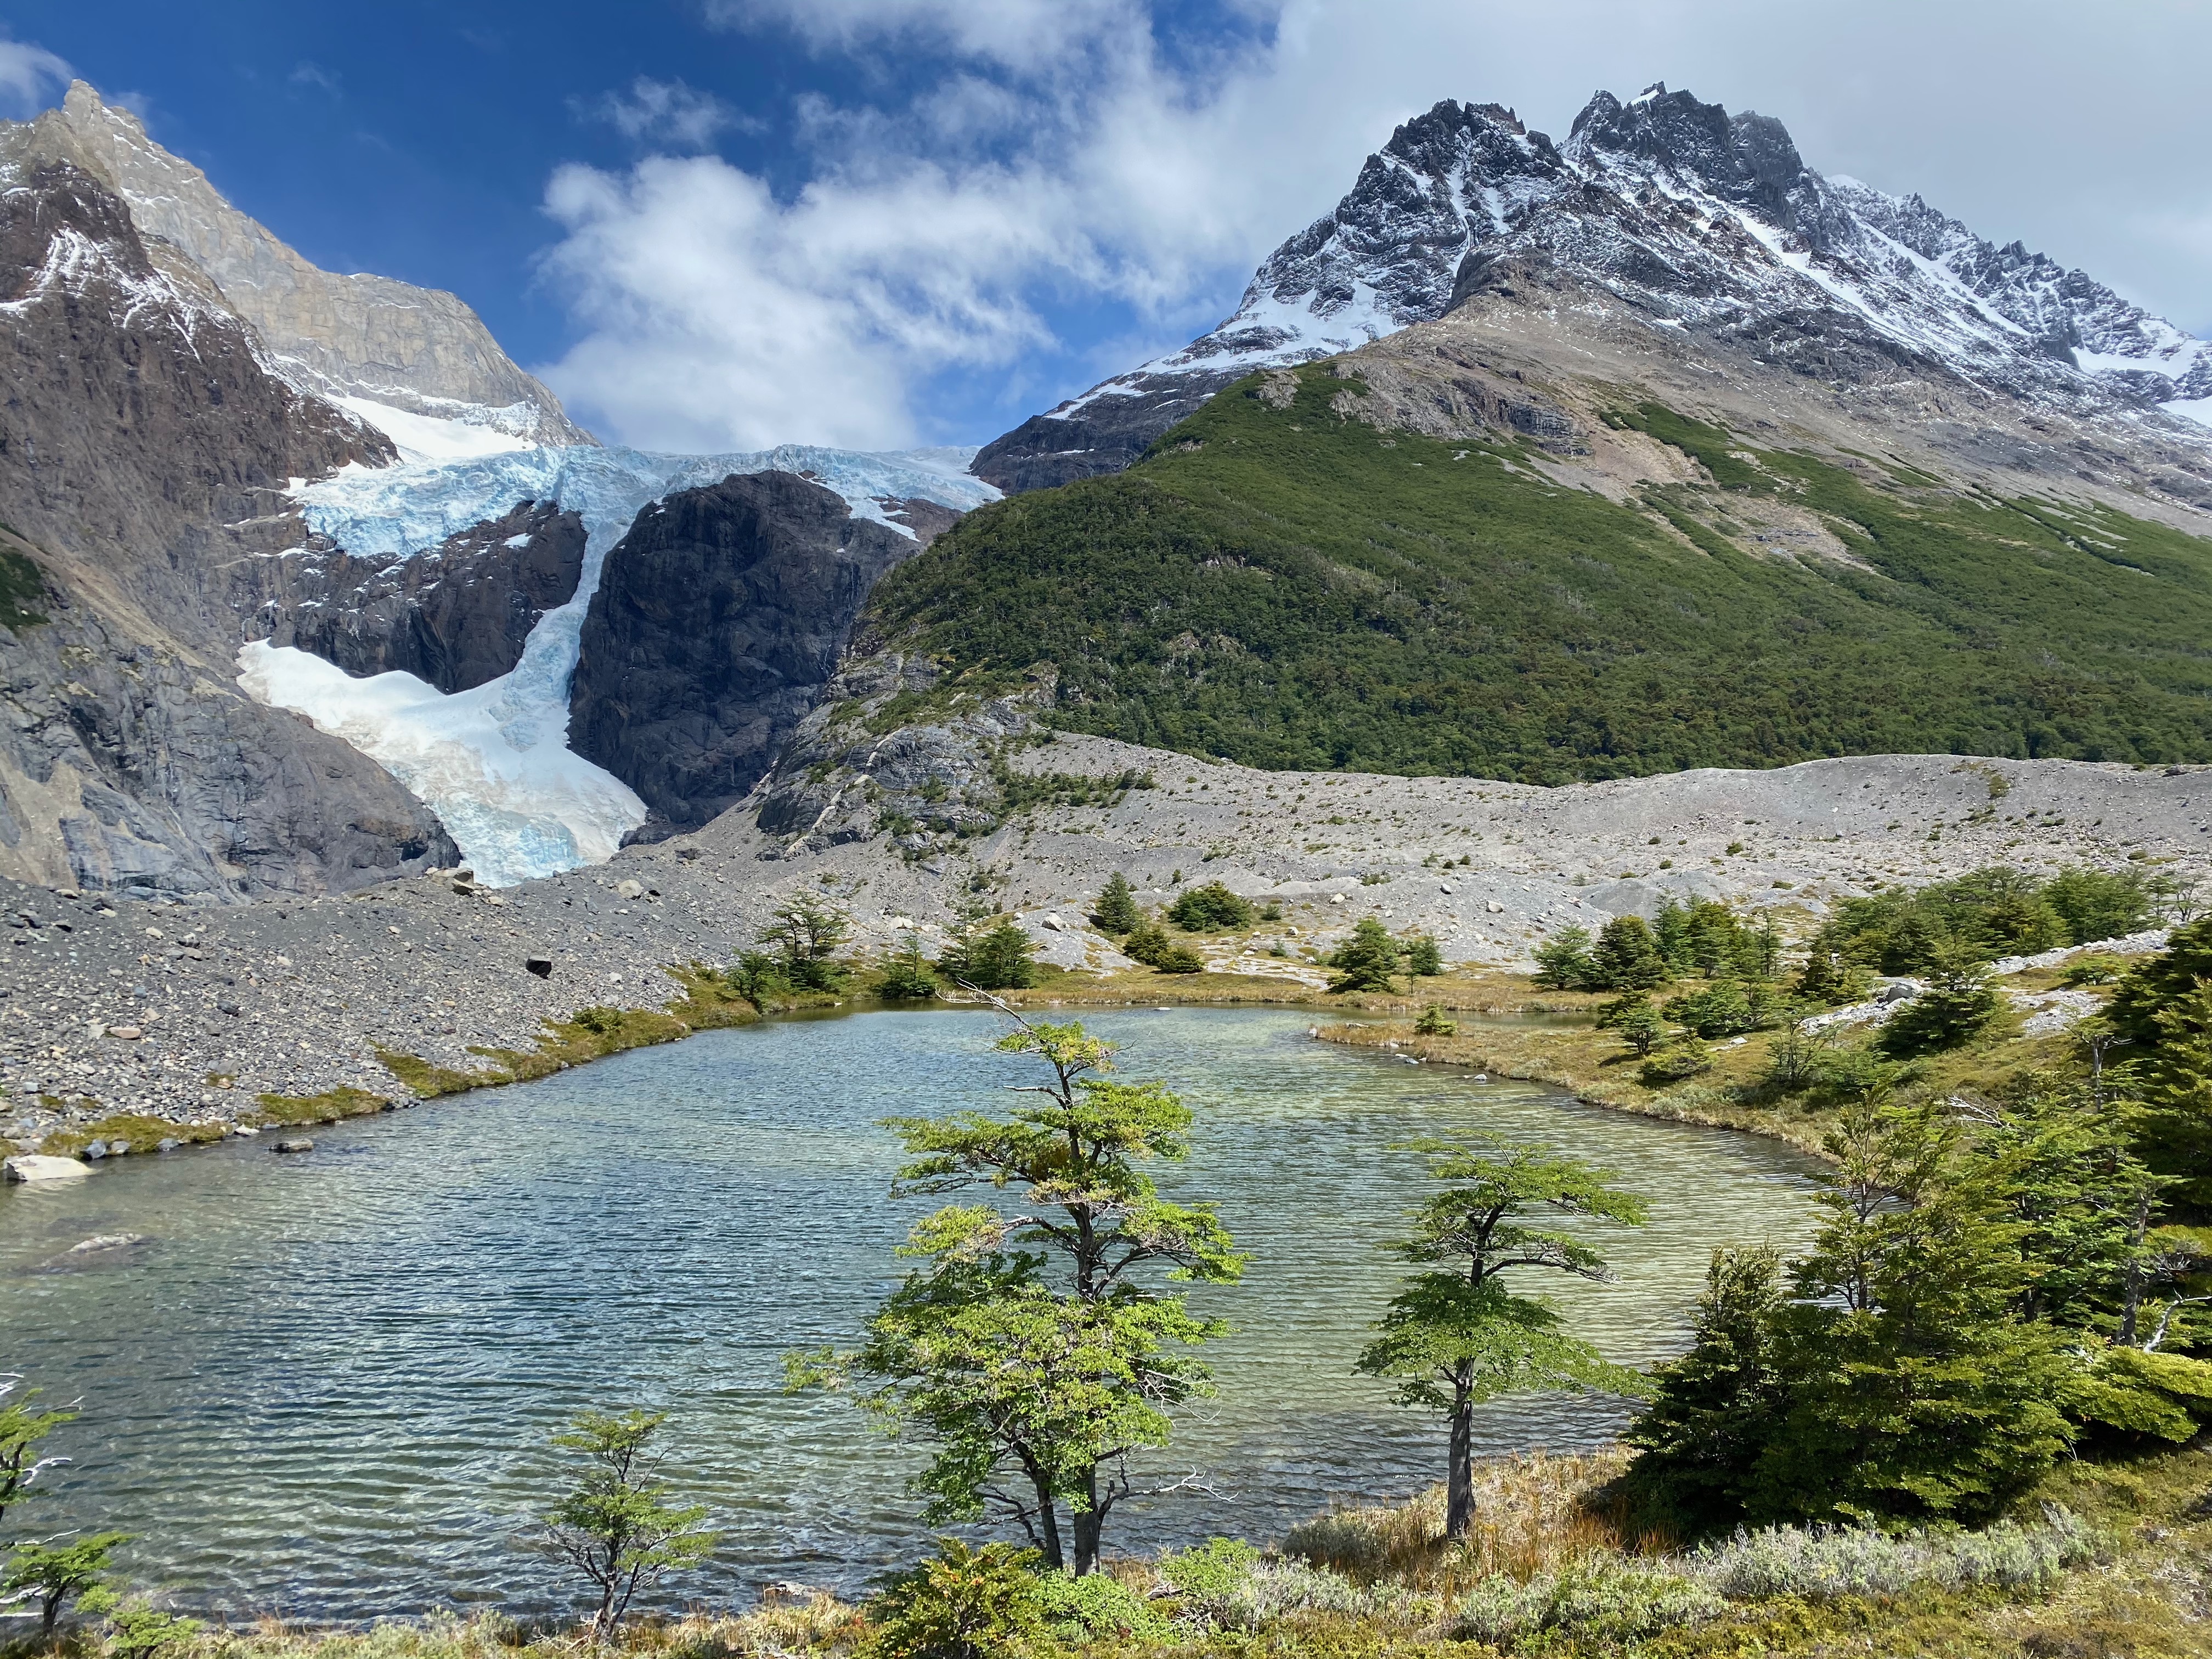
Things To Do: There is a vista that gives a spectacular view of Perros Glacier. Furthermore, the campsite is on the edge of a river. Here, you can relax, use the water to rinse off gear (but remember to carry it away from the river), and just enjoy the views.
Photos:
John Gardner Pass
The John Gardner Pass is probably the toughest part of the O. You will gain around 2000 feet over 2 miles. The pass is exposed, so you are subject to strong winds and subzero temperatures. When we did it, it was also snowing. There will be patches of snow that you need to trudge through, but nothing bad enough to require spikes. As you’re hiking, you will think you’re at the top, but then look up and see there is more to go. Once you do reach the top, you get an awesome view of glacier grey.
Once you’re at the top, you aren’t done yet. Now begins your descent. What goes up must come down. Arguably, the descent is even more challenging than the ascent. There will be points where the trail is so steep that they put a wooden ladder to assist you down. There will be some pretty steep uphills as well, followed by another downhill. For about 1 mile, you’ll be on a cliff’s edge with strong winds.
Camp Paso will be approximately halfway and a good place to take a break and eat lunch. There will be an outdoor cooking shelter where you can make a hot lunch. I would not recommend staying here as it isn’t the greatest campsite, but it is definitely a good place to take an hour or so break.
Paso to Grey is a nice hike. It is relatively flat and through a forest with ocasional view of glacier grey. There are 3 hanging bridges you go over. The hanging bridges can be frightening as they are over deep gorges and can get windy in the middle. They are very secure though so there is no actual danger. Be mindful of other groups and let others completely get off the bridge before you begin; the bridges can bounce around with more than one person on it.
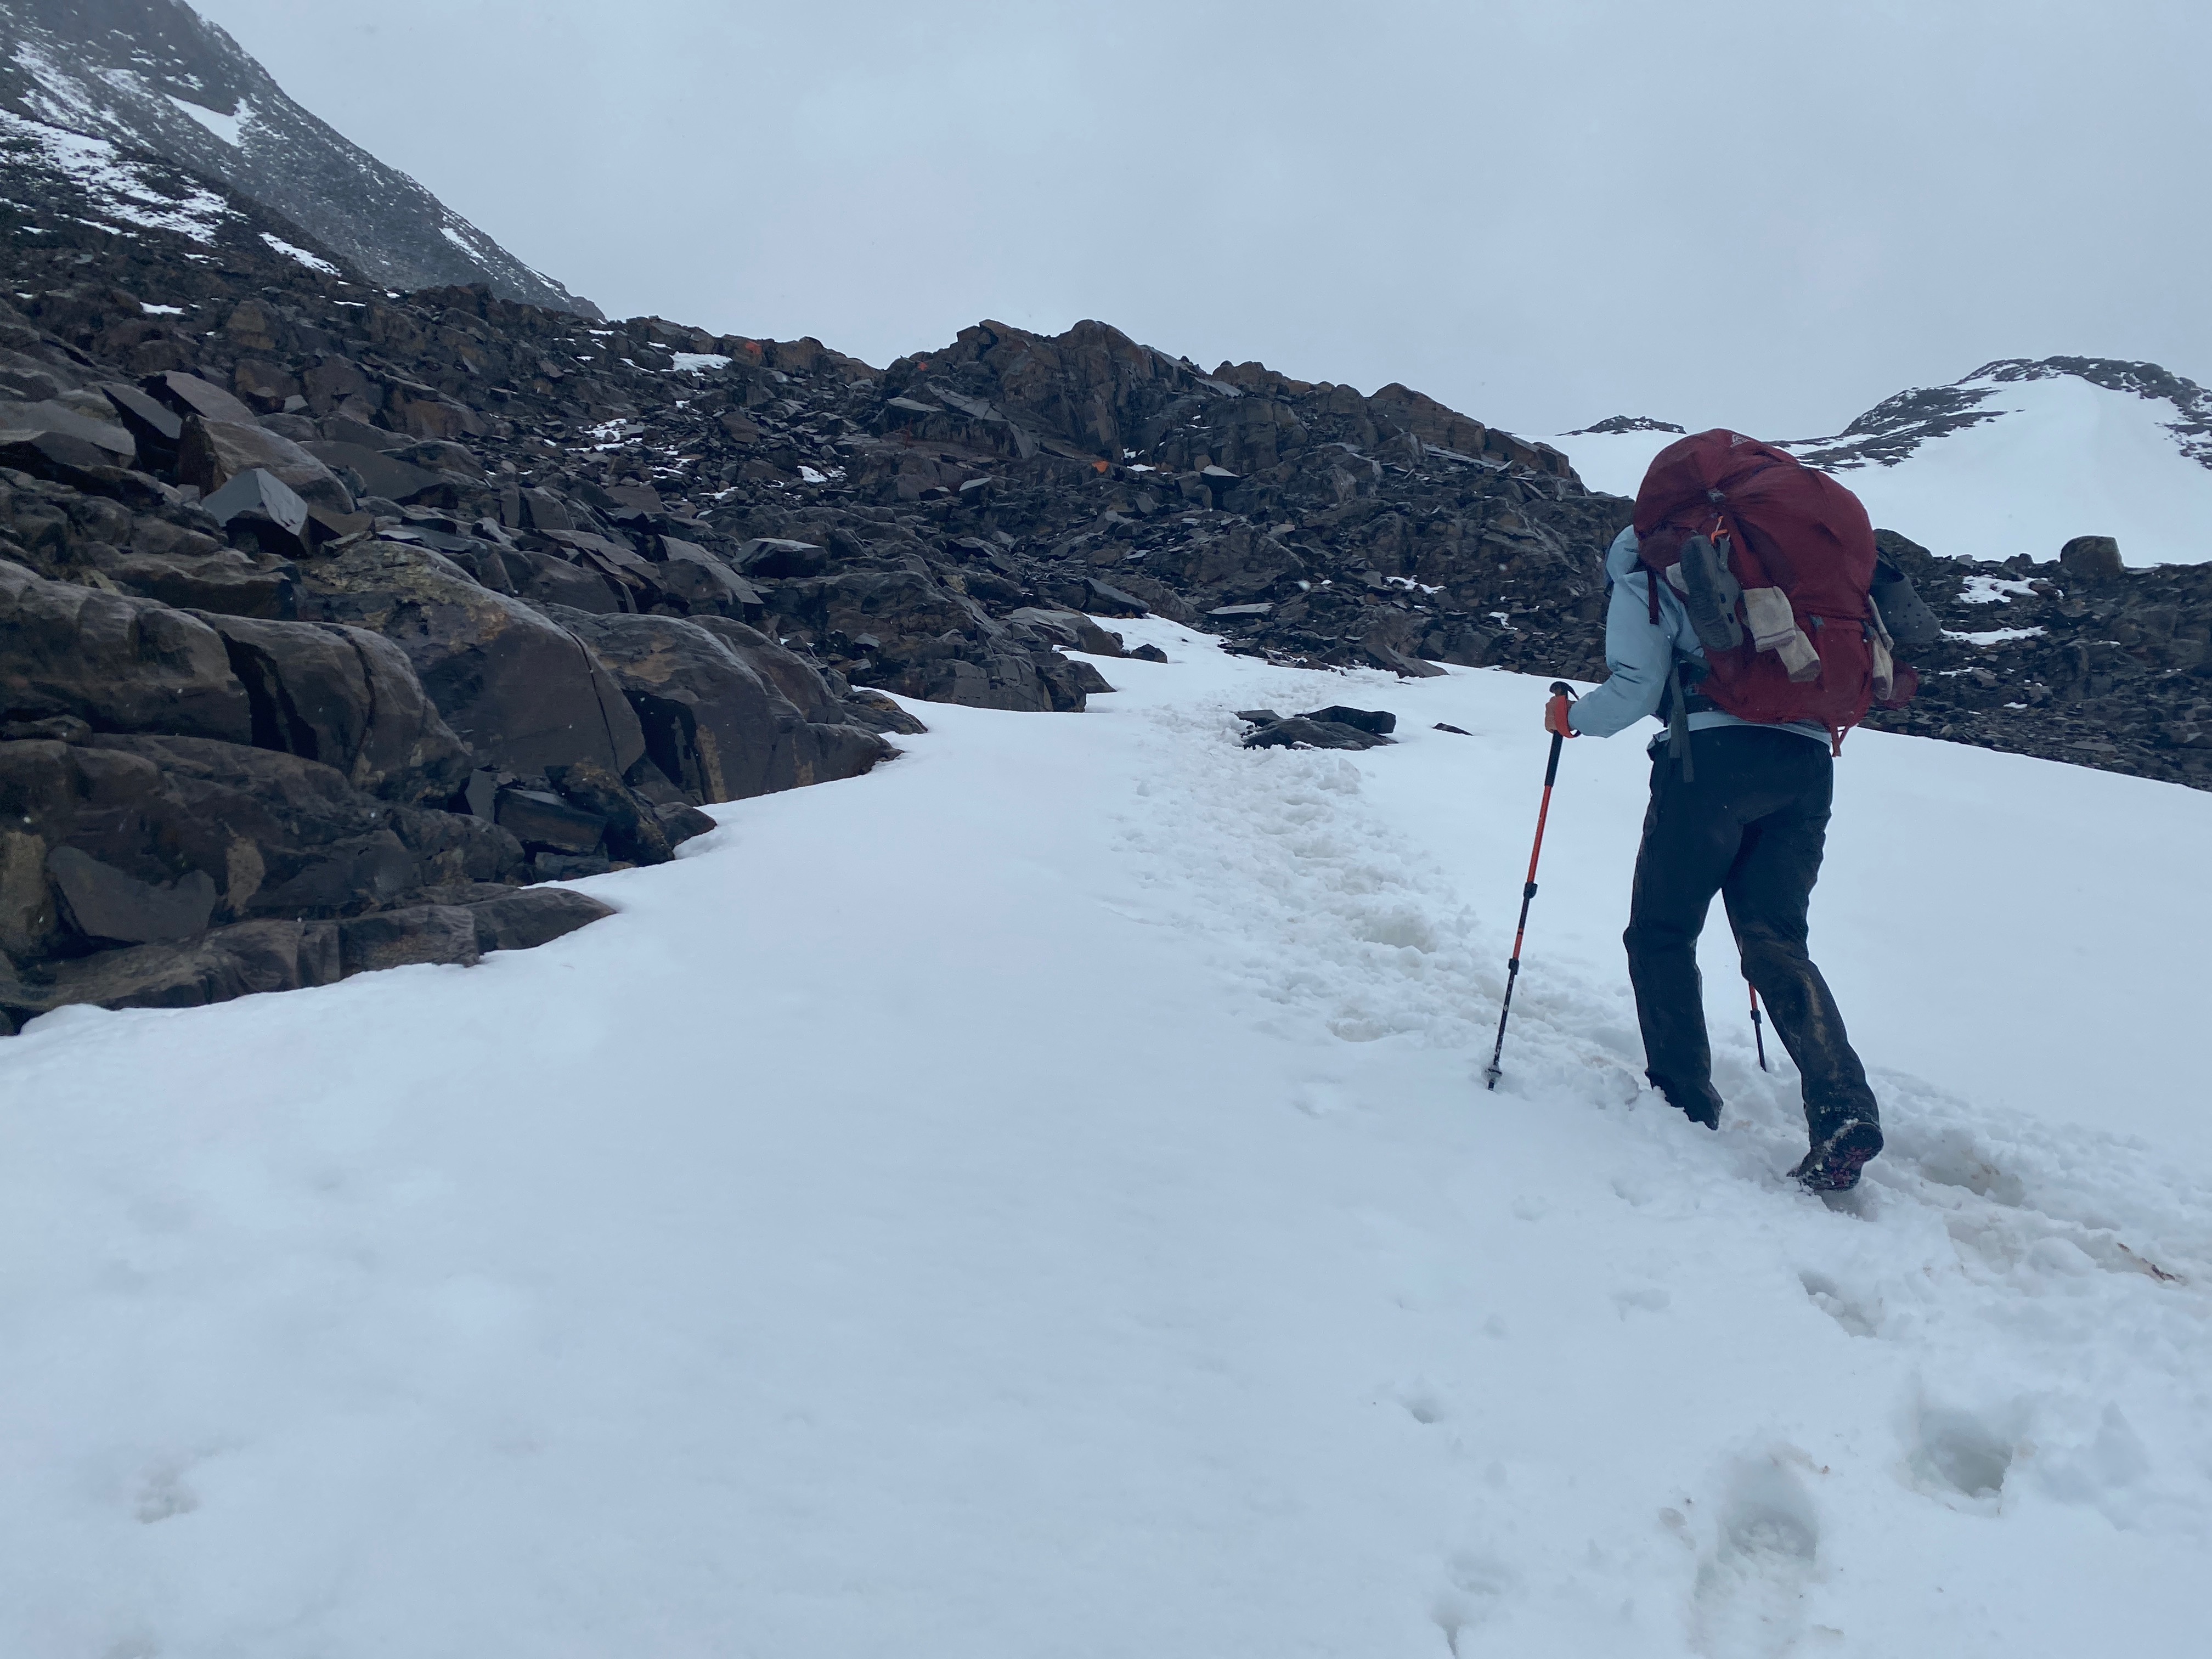
Trudging through snow up the pass.

Hanging bridges en route to Grey.
Grey
Facilities: Grey seemed to have the best facilities thus far. While we didn’t eat at the bar or stay in the dorm, these facilities seemed the best so far.
The bathroom worked very well and the showers were quite clean. The showers also had really hot water which felt great after the pass.
Dining: The dining area was indoors and spacious. The mini mart was well stocked. This is where we bought tortillas, salami, and cheese for a few lunches.
Hike: See John Gardner Pass.
Time To Leave: The next day is relatively easy, so it’s fine to take it easy. We left around 11:30 and made it to Paine grande with plenty of time to spare (~3:30).
Photos:
Paine Grande
Facilities: The bathrooms are quite clean. Toilets and sinks run with good pressure.
Dining: There is a dining hall, but it only opens at 7 am. Thus, if you want to leave at trail open time (6 am), you will need to skip a hot breakfast. This was probably one of the best stocked mini marts and included fresh veggies (such as onions and bellpeppers).
The dining hall has a spectacular view of the lake.
Hike: The hike to Paine Grande is beautiful. You are on red rocks on the left of a large lake pretty much the entire time. We got very lucky with the weather as we pretty much had sun the entire way. You can see where you need to go (the end of the peninsula) which makes the hike rewarding as you get closer.
Time To Leave: If you are staying in Cuernos you have a relatively long day. We left at around 7:30 so we could get an early start and have a hot breakfast.
Photos:

The trail from Grey to Paine Grande.

Sunrise at Paine Grande.
Cuernos
Facilities: Great water pressure in toilets and sinks. Showers had lukewarm water. But hey, you’re at the end of the Earth; just be thankful that you have a shower with good water pressure.
Dining: The mini mart isn’t great, but the food is quite good. This was the one spot we bought dinner at the bar – we had pizza and a veggie burger (with a lentil patty) both of which were quite good.
For breakfast, we did buy eggs, and made scrambled eggs in a zip loc bag which was a welcome change from oatmeal every morning.
Hike: The hike to Cuernos can be long if you take the detour all the way to Britanico. Thankfully, you can leave your backpack at Italiano, so you can do this stretch without any weight. We, however, only went to the first lookout, Frances. You still get an excellent view from here and I recommend at least going up to here.
The end of the hike features a couple of downhill switchbacks which can be hard on the knees if you aren’t prepared. Once you’re done with these, you get to a beautiful beach, with an incredibly blue lake. Enjoy the views and hiking on the beach towards Cuernos.
Time To Leave: You can relax at Cuernos as the next day isn’t too long. We left around 9:30 AM after a nice breakfast.
Photos:


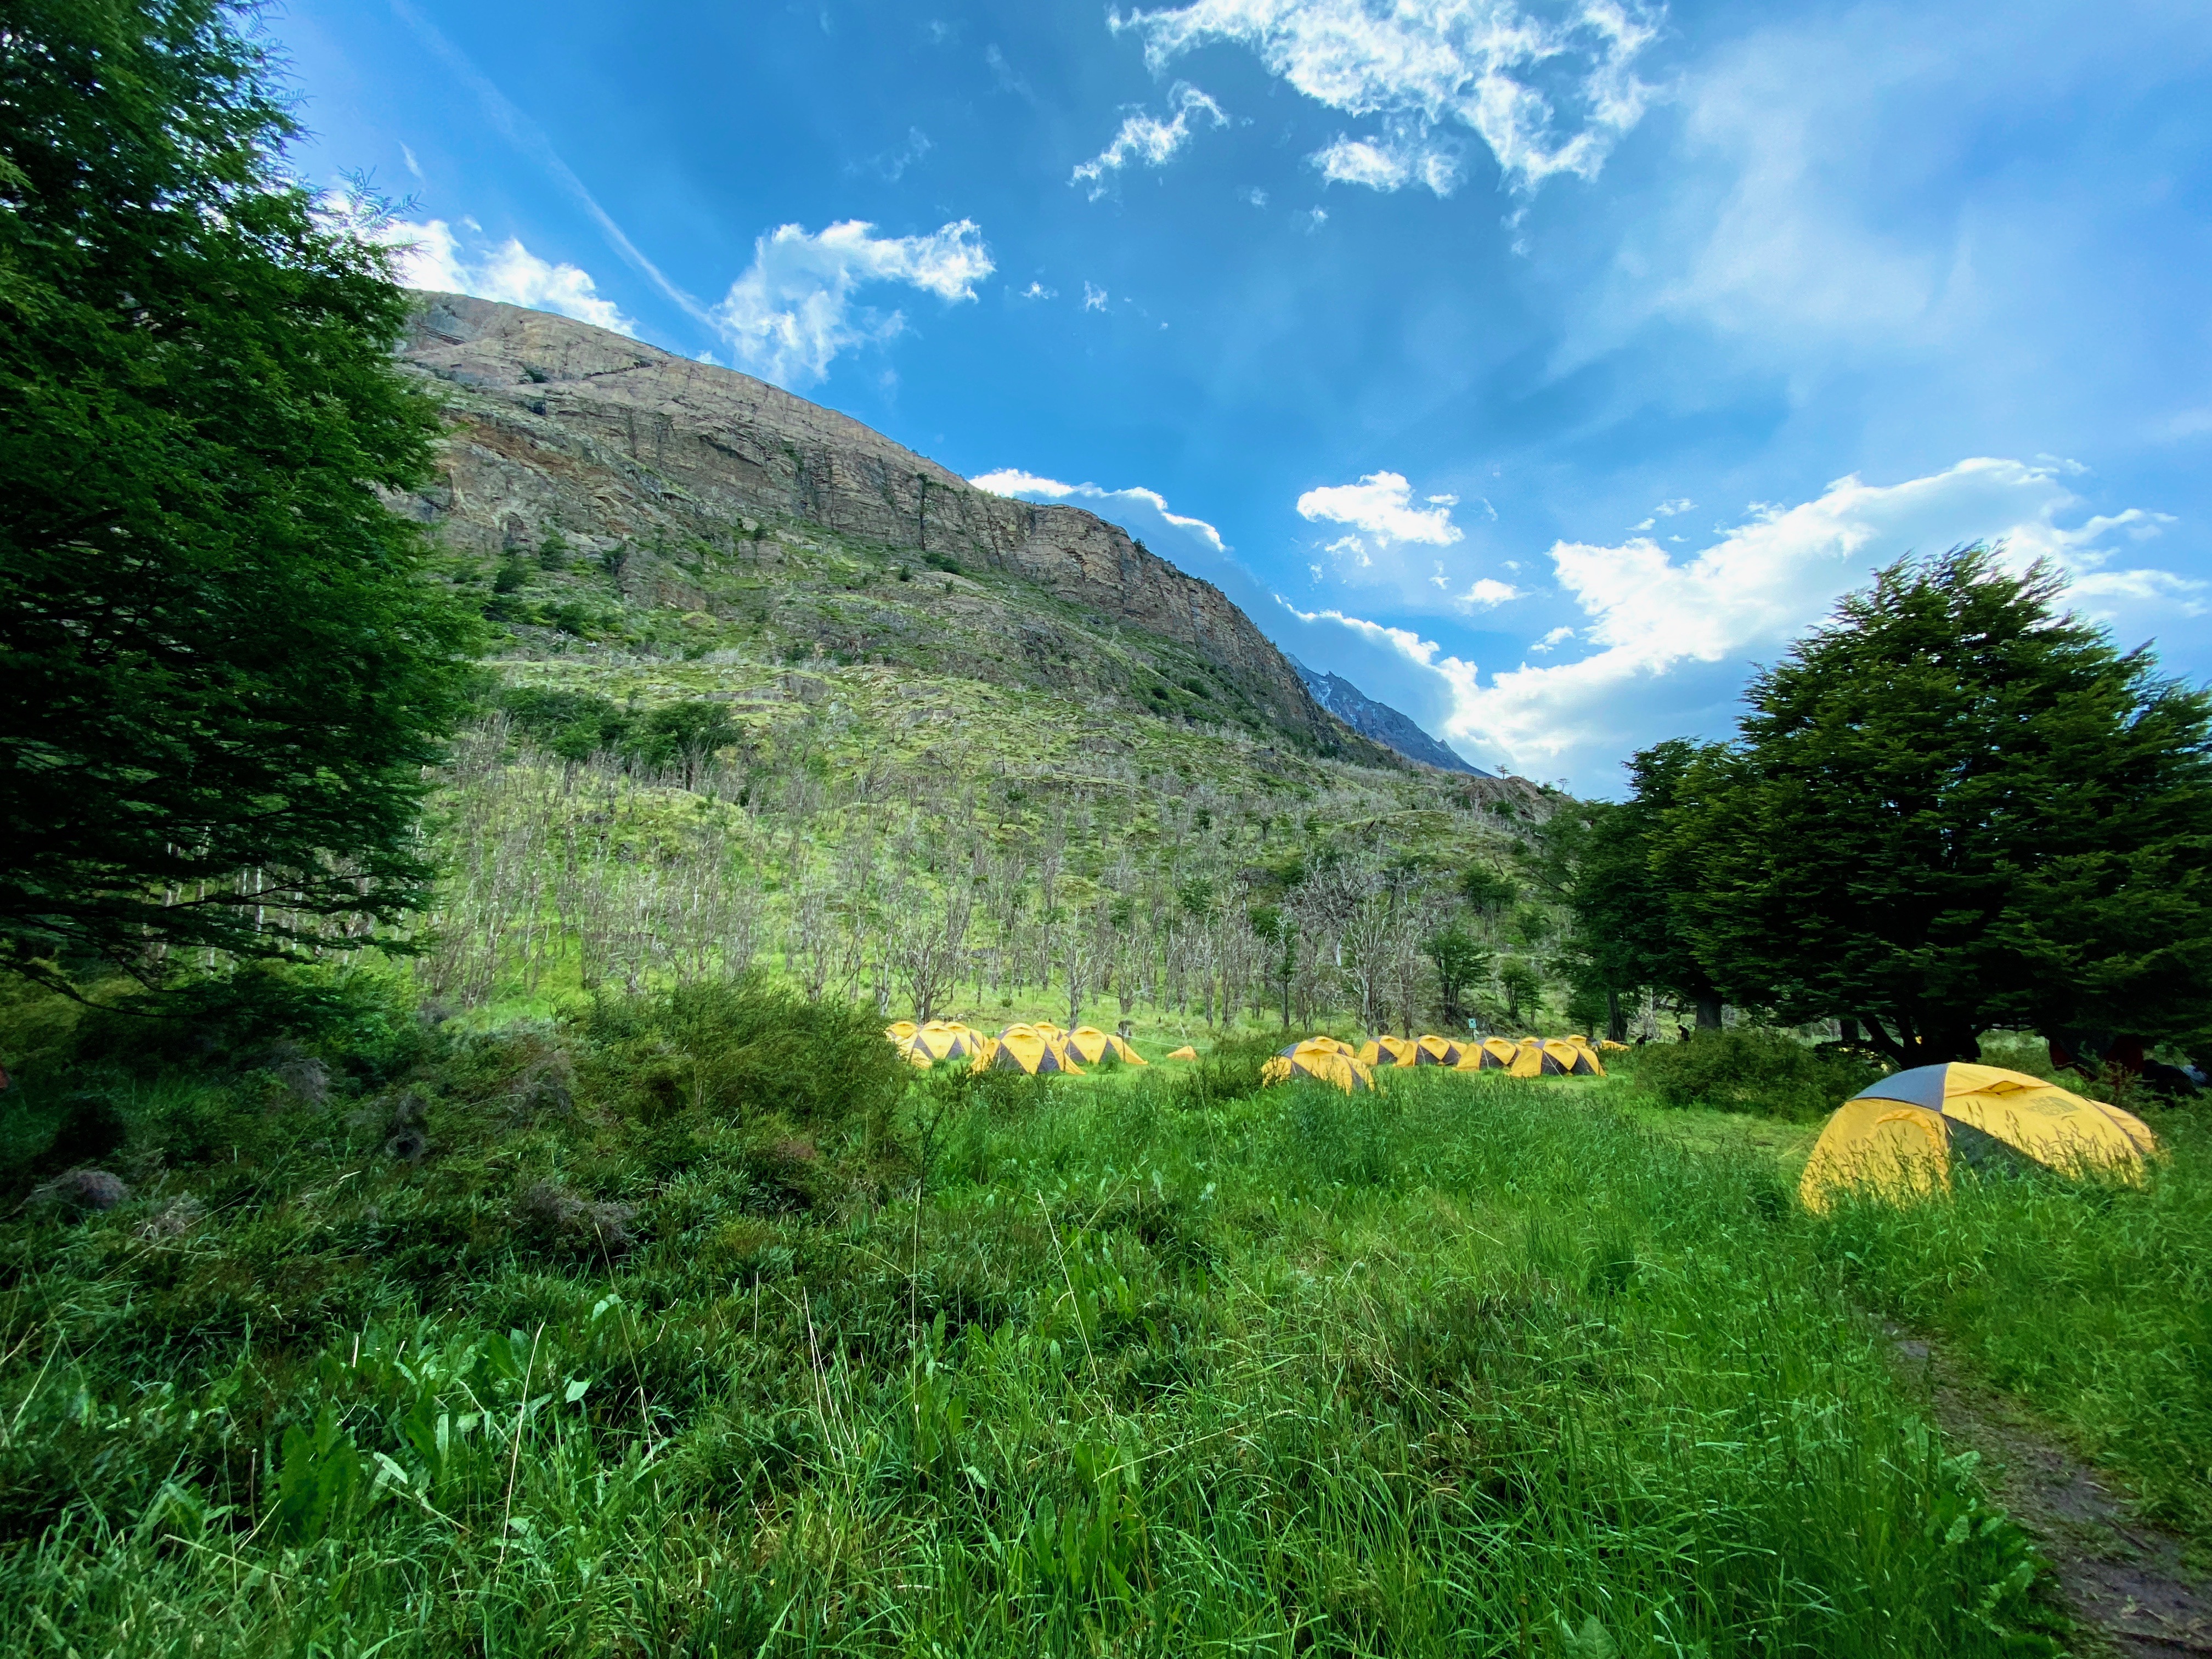
The tents at Cuernos are dotted along the mountainside, as can be seen in this picture.
Chileno
Facilities: The bathrooms are not as clean as the other sites (likely because there are more tourists that come to this spot). I did not check out the showers.
Dining: Chileno is a day hike from Hotel Torres. Thus, the dining facilities will be very crowded with day hikers. Also, this is the one campsite where you cannot cook. They do provide free hot water for campers though.
The bar and cafe are well stocked, but there is no mini mart.
Hike: The hike to Chileno is pretty flat. However, it was the windiest hike we had as you are exposed for a good portion of it. You also have a view of Hotel Torres as you trek to Chileno. It is so tempting to just leave the park at this point. Honestly, if you aren’t planning to go to the Torres, you can probably skip Chileno entirely and just leave the park.
Time To Leave: It’s your last day. Leave when you like. If you want to do the sunrise hike, you probably want to leave around 2 - 3 am to catch sunrise hitting the Torres. If you’re just leaving the park, the hike out is ~2 hours, so just coordinate with your shuttle times.


